Welcome! I am an engineer, programmer, designer, and gentleman. You may be interested in some of my electrical and mechanical projects. Take everything you read here with a grain of salt and remember to wear your safety glasses.

Adding "Edit with Emacs" to Windows

I've long wanted to be able to right-click any file in Windows and have “Edit with Emacs” among the options there. Upgrading my desktop computer after many years gave me the right motivation to finally implement little productivity improvements like this one. The following is a registry file that I've tested on Windows 7 and 10. It is hardly original—many others have posted similar things on Stack Exchange and elsewhere—but I'm documenting this version of it here really so I don't forget it myself.

Windows Registry Editor Version 5.00

[HKEY_CLASSES_ROOT*\shell]
[HKEY_CLASSES_ROOT*\shell\openwemacs]
@="&Edit with Emacs" 
"icon"="C:\\emacs-26.1\\bin\\emacsclientw.exe"
[HKEY_CLASSES_ROOT*\shell\openwemacs\command]
@="C:\\emacs-26.1\\bin\\emacsclientw.exe --alternate-editor=\"C:\\emacs-26.1\\bin\\runemacs.exe\" -n \"%L\""
[HKEY_CLASSES_ROOT\Directory\shell\openwemacs]
@="Edit &with Emacs"
"icon"="C:\\emacs-26.1\\bin\\emacsclientw.exe"
[HKEY_CLASSES_ROOT\Directory\shell\openwemacs\command]
@="C:\\emacs-26.1\\bin\\emacsclientw.exe --alternate-editor=\"C:\\emacs-26.1\\bin\\runemacs.exe\" -n \"%L\""

Building a New Desktop PC After Nine Years

In the last month I assembled a new desktop computer for myself. This is my first significant upgrade in nine years, a timespan that my teenage self in the mid-nineties would have found unbelievable. At the time the upgrade cycle was something like three years long for anyone, even non-gamers, trying to keep up with typical software demands. In other words, the slowing of that cycle has allowed me to skip two major upgrades entirely, and I might even have kept going for a few more years except that my old video card was starting to fail with increasing frequency, and it wouldn't support DirectX 10. Although I'm not much of a gamer anymore, I had become aware of Planet Coaster, a sort of spiritual successor to the RollerCoaster Tycoon that consumed quite a lot of my time in the early 2000s, and obviously I had to play it.

AMD CPU after nine years, on the left, and the new motherboard, CPU cooler, RAM, and video card on the right.

3D-Printed Organizer Bins for Crimp Terminals

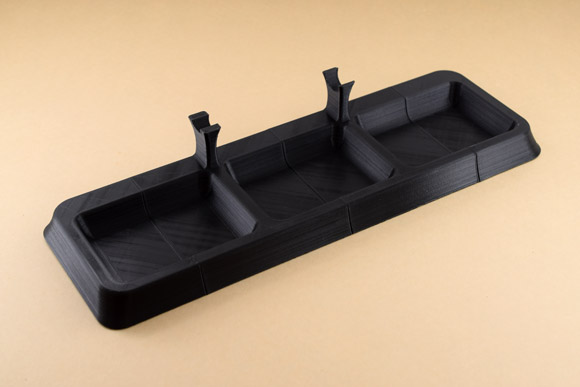
3D-printed bins, in black PLA, keep a larger variety of parts organized.

I recently needed to crimp some right-angle “flag”-style quick-disconnect terminals, which meant buying yet another crimp tool (turns out you can't use the same one you use for straight terminals) and yet more small parts, which of course have to be kept organized. To replace the various disconnected organizers I was using for this type of part I purchased a 15-inch Flambeau Merchant Box with lift-out tray, $19.99 at Orchard Supply.

I used the lift-out tray to acommodate a sheet of 1 1/8 inch Kaizen foam, a product I've used before to make drawer organizers for my office. Kaizen foam is made of layers that can be peeled from each other (but not as cleanly as you might want), so that you can draw an outline of a tool on the foam, cut straight down to the appropriate depth using a razor blade or other knife, and then hollow out the foam to that depth by digging with your fingers. This gave me a place for my crimp tools plus some room for future expansion.

Y-Axis Stop Upgrade for Prusa i3 3D Printer

The new part triggering the microswitch. Success!

Since day one of using Crystal Palace, my Reprapguru Prusa i3 V2 clone, I've been planning to fix the poor design of the y-axis stop switch. The Reprapguru design is annoying but marginally usable with careful adjustment and frequent human intervention, but after making a small bumper part on the 3D printer and screwing it to the bearing housing (all of forty minutes of effort) the problem is solved and I don't have to worry about it anymore. Not bad for a full year of irritation and procrastination!

Read more here.

Sunshine Through the Tall Grass: an Original Cocktail for Summer

Perfect for a picnic!

Although I haven't blogged about any cocktail since last July, I haven't abandoned the lab; in fact, I'm finally ready for a first: publishing an original! I've been playing with this one for months but as it's obviously a summer drink, I'm releasing it only now, when you need it the most. Herbal, bright, cold, and not so boozy you wouldn't want a few before five o'clock, Sunshine Through the Tall Grass is just right for hot weather, long days, and meals outside. Here's what you do:

  • 1 1/2 oz. gin. I used The Botanist for this, but I'm not too particular.
  • 1/2 oz. Chartreuse
  • 1/2 oz. lemon juice, fresh squeezed
  • 2–3 oz. ginger beer; I recommend Fever Tree.
  • Tarragon and lemon wheel to garnish

Fill a rocks glass with crushed ice. Place a generous bunch of tarragon leaves on the palm of one hand and slap it hard with the other. Then plant this bunch in the ice, artfully, along one side of the glass. Add gin, Chartreuse and lemon juice to a cocktail shaker full of ice cubes. Shake vigorously and strain into the glass. Top off with something like 2 to 3 oz. of ginger beer, depending on the size of your glass, how full of ice you had it, and how sweet you want this drink to be. Place a lemon wheel on the rim behind the tarragon for a sunset-through-the-grass effect.

Go ahead and try this while the weather's warm. I'd love to hear about your results and about any variations you try!

Archives: